Survey
Survey is the main onboard program for measuring and recording coordinates.
In this paragraph it is visualized step-by-step the procedure to create a new job, perform an orientation and start to measure points.
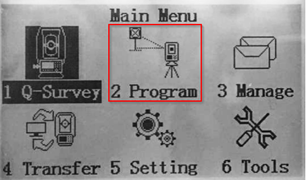
Start Survey program
From the main page, select 2.Program, and then F1-Surveying to start the survey.
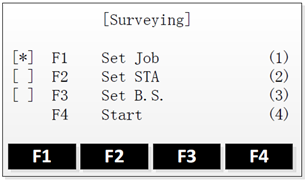
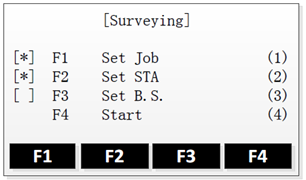
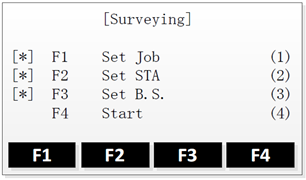
The Surveying menu is comparable to Q-Survey, but in addition you can do some pre-settings: set the job, select the Station and set the orientation.
Job selection
If the job has not been set yet, then you can select F1- Set Job, to either create a new job or choose an existing job from memory.

Clicking on OK will validate and return to the Surveying page.
Each completed setting will be marked with [*].
Station settings
From the Surveying page, select F2-Set STA to define the current position of the instrument station.
Then, you can either:
Search for an existing point by entering the point name (Find),
or select a point from the list of existing points (List),
or by manually entering the point’s coordinates (Coord.).
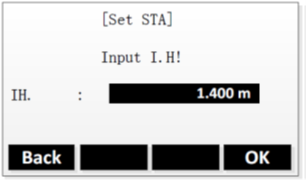
Instrument height
Once the station coordinates are set, you can enter the instrument height.
Orientation settings
From the Surveying page, select F3-Set B.S. to define the orientation of the current station.
Then you can either set the orientation manually (5.1),
Or calculate and set the orientation using existing coordinates (5.2)
Orientation by azimuth
From the Set B.S page, select F1-Angle Setting.
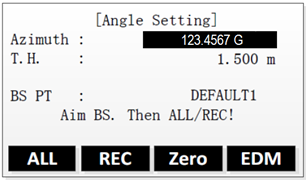
Aim the backsight point, and then set the orientation by one of the following options:
Manually input the azimuth as well as the prism height and backsight point name, then press REC,
Set the azimuth to 0 (by clicking on Zero), then press REC,
Measure and set the azimuth, by pressing ALL.
Orientation by coordinates
From the Set B.S page, select F2-Coord.
You can set the coordinates of the backsight point either by:
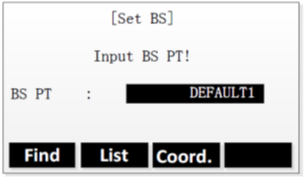
Searching for an existing point by entering the point name (Find),
Selecting a point from the list of existing points (List),
Manually entering the point’s coordinates (Coord.).
Then press OK to confirm the point.
Once the coordinates are set, aim at the backsight point and press
 .
.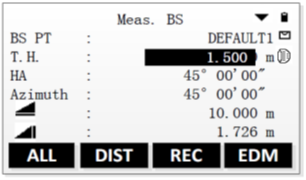
The azimuth can be set by one of these options:
To measure and check the azimuth, press DIST.
To measure and set the azimuth, press ALL.
Once the orientation is set, the 3 pre-settings will be marked by [*], which means that you’re ready to start the survey (F4-Start).
If no orientation is set and an application is started, the current horizontal direction is set as the orientation.
Start survey
To start the survey, select F4-Start.

And follow these steps:
Enter a point ID (Pt.) and the reflector height (T.H.).
If needed, enter a code.
Aim at the target point.
To start measuring and save the measured values, press ALL or DIST+REC.
Tepeat the previous steps to measure another point.
To change and move to another station, you should repeat the steps above, starting from Step 2.
From the 3rd station onwards, when you want to backsight on previous station, the Zoom10 will popup up a warning message:

Please use the Rename option to differentiate multiple sets of measurements at the same station!
By using X-PAD Fusion for your TPS data calculation, the renaming of these multiple sets of measurement on same stations, will be handled automatically after the data transfer!