Instrument setup
This topic describes an instrument setup over a marked ground point using the laser plummet. It is always possible to set up the instrument without the need for a marked ground point.
It is always recommended to shield the instrument from direct sunlight and avoid uneven temperatures around the instrument.
The laser plummet described in this topic is built into the vertical axis of the instrument. It projects a red spot onto the ground, making it appreciably easier to centre the instrument.
The laser plummet cannot be used with a tribrach equipped with an optical plummet.
Torsion in tripod heads decreases overall accuracy. Always use a high-quality wooden tripod when using robotic instruments.
Setting up the instrument
Instrument setup step-by-step:
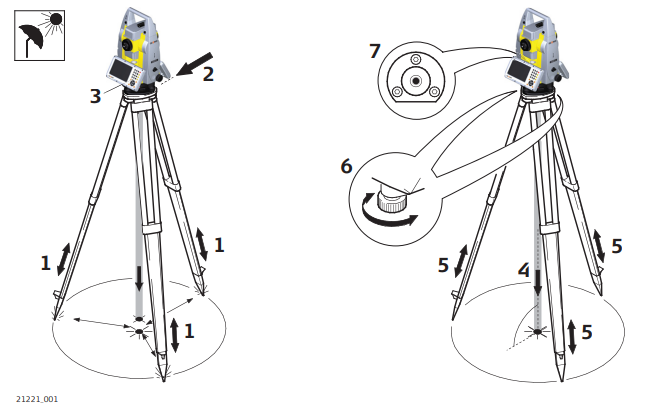
Extend the tripod legs to allow for a comfortable working posture. Position the tripod over the marked ground point, centring it as well as possible.
Fasten the tribrach and instrument onto the tripod.
Turn on the instrument by pressing ON button. Activate the laser plummet and electronic level by pressing the key combination <FNC>+<.> or by starting up the GeoMax Toolkit and selecting from MAIN MENU: Level.
Move the tripod legs (1) and use the tribrach footscrews (6) to centre the plummet (4) over the ground point.
Adjust the tripod legs to level the circular level (7).
By using the electronic level, turn the tribrach footscrews (6) to level the instrument precisely.
Centre the instrument precisely over the ground point (4) by shifting the tribrach on the tripod plate (2).
Repeat steps f. and g. until the required accuracy is achieved.
Level up with electronic level using GeoMax Toolkit
It is also possible to open the electronic level in X-PAD Ultimate software. Please refer to X-PAD Ultimate manual for more information.
To level using the electronic level in GeoMax Toolkit:
Turn the instrument until the tubular level is parallel to two footscrews.
Centre the level on the instrument approximately by turning the footscrews of the tribrach.
Centre the electronic level for the first axis by turning the two footscrews.
Centre the electronic level for the second axis by turning the last footscrew.
When the electronic level is centred and both axes are within the tolerance limit, the instrument has been levelled up.

Setting up for remote control
Setup for remote control with the RadioHandle.
