
The program can import data from files in AutoCAD formats DXF and DWG.
-
Click Home.
-
Click X-PAD Survey.

-
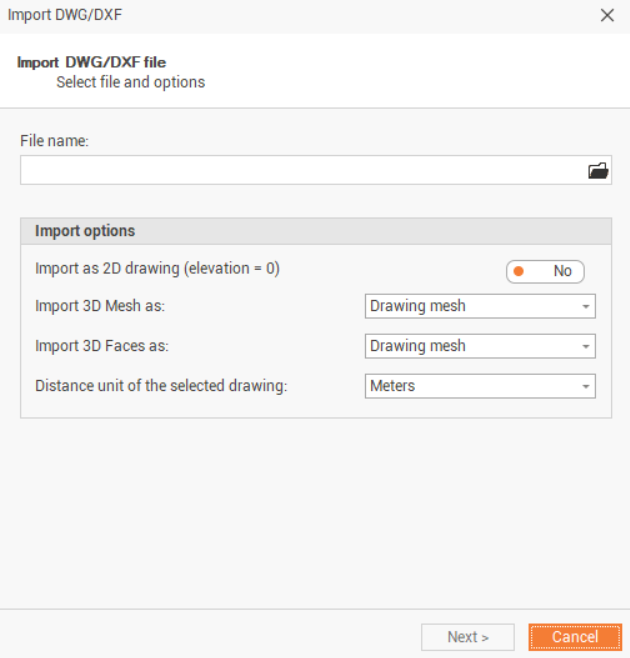
This command opens the following window:
-
Select the file to import clicking on the folder icon:
-
Computer: to import the file from a computer folder.
-
X-PAD 365 Storage Area: to import thefile from the X-PAD 365 cloud storage.
-
OneDrive: to import the file from OneDrive cloud storage.
-
Controller: to import the file directly from a connected controller.
-
-
Select the import parameters:
-
Import as 2D drawing: toggles the import of data without elevation. All items will be imported with the quota equal to 0.
-
Import 3D Mesh as: selects how 3D meshes are imported in the project.
-
Drawing mesh: 3D meshes in the imported file are imported as drawing meshes.
-
Surface: : 3D meshes in the imported file are imported as surface.
-
-
Import 3D faces as: selects how 3D faces are imported in the project.
-
Drawing mesh: 3D faces in the imported file are imported as drawing meshes.
-
Surface: : 3D faces in the imported file are imported as surface.
-
Polyline: 3D faces in the imported file are imported as closed polylines.
-
-
Distance unit of the selected drawing: allows you to set the drawing units used in the AutoCAD file. The drawing will be imported into the project unit of measure.
-
-
Click Next.
-
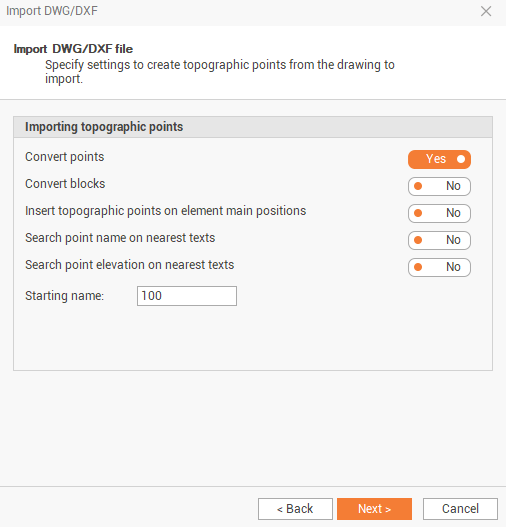
Convert points: enables/disables conversion of the AutoCAD point entity in the file to topographic points.
-
Convert blocks: enables/disables the conversion of blocks in the AutoCAD file to topographic points.
-
Insert topographic points on element main positions: toggles the automatic insertion of topographic points at the vertices of the imported drawing elements.
-
Search point name on nearest texts: allows to search the name to assign to the topographic point to the nearest text to the point entity.
-
Search point elevation on nearest texts: allows to search the elevation to assign to the topographic point to the nearest text to the point entity.
-
Starting name: allows you to set the name of the first point created by one of the previous options. The following points will have a progressive name (100,101,102, etc.).
-
-
Click Next to complete the import of the file.